
공부하자
[Spring Boot] 3. 데이터 주고받기 본문
* 참고 도서 : 쇼다 츠야노 (2017). 스프링 부트 프로그래밍 입문. 길벗
* 가급적 자주, 적어도 일주일에 한번 이상은 포스팅하려고 합니다.
* 이전 포스팅 : [Spring Boot] 2. Spring Starter 프로젝트 생성
1. 컨트롤러에서 템플릿으로 값 전달
- TestController.java
|
1
2
3
4
5
6
7
8
9
10
11
12
13
14
15
16
17
18
19
20
21
22
23
|
package com.star.springboot;
import org.springframework.stereotype.Controller;
import org.springframework.ui.Model;
import org.springframework.web.bind.annotation.PathVariable;
import org.springframework.web.bind.annotation.RequestMapping;
@Controller
public class TestController {
@RequestMapping("/")
public String index() {
return "index";
}
@RequestMapping("/{num}")
public String index(@PathVariable int num, Model model) {
int res = num;
model.addAttribute("msg", "num : " + res);
return "index";
}
}
|
cs |
더보기
|
1
2
3
4
5
6
7
|
@RequestMapping("/{num}")
public ModelAndView index(@PathVariable int num, ModelAndView mav) {
int res = num;
mav.addObject("msg", "num : " + res);
mav.setViewName("index");
return mav;
}
|
cs |
- index.html
|
1
2
3
4
|
<body>
<h1>Hello World</h1>
<p class="msg" th:text="${msg}"></p>
</body>
|
cs |
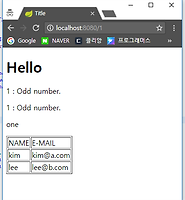
- 실행 결과


url로 넘긴 파라미터가 출력되는 것을 확인할 수 있다.
2. 폼 사용하기
- TestController.java
|
1
2
3
4
5
6
7
8
9
10
11
12
13
14
15
16
17
18
19
20
21
22
23
24
25
|
package com.star.springboot;
import org.springframework.stereotype.Controller;
import org.springframework.ui.Model;
import org.springframework.web.bind.annotation.RequestMapping;
import org.springframework.web.bind.annotation.RequestMethod;
import org.springframework.web.bind.annotation.RequestParam;
@Controller
public class TestController {
@RequestMapping("/")
public String index(Model model) {
model.addAttribute("msg", "input your id.");
return "index";
}
@RequestMapping(value="/", method=RequestMethod.POST)
public String send(@RequestParam("id1")String id, Model model) {
model.addAttribute("msg", "Hi. " + id + "!!");
model.addAttribute("id2", id);
return "index";
}
}
|
cs |
- index.html
|
1
2
3
4
5
6
7
8
|
<body>
<h1>Hello World</h1>
<p th:text="${msg}">wait.</p>
<form method="POST" action="/">
<input type="text" name="id1" th:value="${id2}" />
<input type="submit" value="Click" />
</form>
</body>
|
cs |
- 실행 결과

get 방식이라 "input your id." 라는 메세지가 출력된다.
여기서 input창에 입력하고 Click 버튼을 누르면??

이렇게 된다!
3. redirect, forward
- TestController.java
|
1
2
3
4
5
6
7
8
9
10
11
12
13
14
15
16
17
18
19
20
21
22
23
24
25
|
package com.star.springboot;
import org.springframework.stereotype.Controller;
import org.springframework.ui.Model;
import org.springframework.web.bind.annotation.RequestMapping;
@Controller
public class TestController {
@RequestMapping("/")
public String index(Model model) {
return "index";
}
@RequestMapping(value="/redi")
public String other() {
return "redirect:/";
}
@RequestMapping(value="/forw")
public String home() {
return "forward:/";
}
}
|
cs |
- index.html
|
1
2
3
4
|
<body>
<h1>Hello World</h1>
</body>
|
cs |
실행 결과

/ 뒤에 redi 까지 쳐서 이동하면?

/redi 자체가 / 로 바뀐다.

/forw 는 그대로 남아있는 것을 확인할 수 있다.
3장까지의 내용이 끝났습니다. (이 블로그는 매우 압축함)
'공부 > Spring Boot' 카테고리의 다른 글
| [Spring Boot] 5. 타임리프 (2) (0) | 2017.12.01 |
|---|---|
| [Spring Boot] 4. 타임리프 (1) (2) | 2017.11.24 |
| STS, Eclipse 에서 Maven istall 할 때 발생하는 에러 해결법 (0) | 2017.11.10 |
| [Spring Boot] 2. Spring Starter 프로젝트 생성 (0) | 2017.11.07 |
| [Spring Boot] 1. Maven 프로젝트 생성 (0) | 2017.11.02 |
'공부/Spring Boot' Related Articles
more


Comments