공부하자
[Spring Boot] 6. 타임리프 (3) 본문
* 참고 도서 : 쇼다 츠야노 (2017). 스프링 부트 프로그래밍 입문. 길벗
* 가급적 자주, 적어도 일주일에 한번 이상은 포스팅하려고 합니다. (반성하는 중..)
* 이전 포스팅 : [Spring Boot] 5. 타임리프 (2)
1. 전처리
변수식 앞에 밑줄(_) 2개를 사용합니다.
__${값}__ 이렇게요.
- TestController.java
1 2 3 4 5 6 7 8 9 10 11 12 13 14 15 16 17 18 19 20 21 22 23 24 25 26 27 28 29 30 31 32 33 34 35 36 37 38 39 40 41 42 | package com.star.springboot; import java.util.ArrayList; import org.springframework.stereotype.Controller; import org.springframework.web.bind.annotation.PathVariable; import org.springframework.web.bind.annotation.RequestMapping; import org.springframework.web.servlet.ModelAndView; @Controller public class TestController { @RequestMapping("/{num}") public ModelAndView index(@PathVariable int num, ModelAndView mav) { mav.setViewName("index"); mav.addObject("num", num); if(num >= 0) { mav.addObject("check", "num >= list.size() ? 0 : num"); } else { mav.addObject("check", "num*-1 >= list.size() ? 0 : num*-1"); } ArrayList<Person> list = new ArrayList<Person> (); list.add(new Person("kim", "kim@a.com")); list.add(new Person("lee", "lee@b.com")); list.add(new Person("park", "park@c.com")); mav.addObject("list", list); return mav; } class Person { public String name; public String email; public Person(String name, String email) { this.name = name; this.email = email; } } } | cs |
- index.html
1 2 3 4 5 6 7 8 9 10 11 12 13 14 15 16 17 18 19 20 21 22 23 24 25 26 27 | <!DOCTYPE html> <html xmlns:th="http://www.thymeleaf.org"> <head> <meta http-equiv="Content-Type" content="text/html; charset=UTF-8" /> <title>Title</title> </head> <body> <h1>Hello</h1> <!-- 리터럴 치환 --> <p th:text="|expression : ${check}|"></p> <!-- 전처리 --> <table th:object="${list.get(__${check}__)}" border="1"> <tr> <td>NAME</td> <td>E-MAIL</td> </tr> <tr> <td th:text="*{name}"></td> <td th:text="*{email}"></td> </tr> </table> </body> </html> | cs |
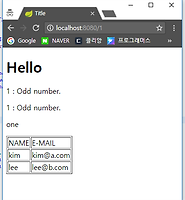
- 실행 결과
2. 인라인 처리
th:inline="text" 라고 작성된 태그 내부에서만 처리 가능합니다.
[[${값}]] 의 형식으로 사용합니다.
- TestController.java
1 2 3 4 5 6 7 8 9 10 11 12 13 14 15 16 17 18 19 20 21 22 23 24 25 26 27 28 29 30 31 32 33 34 | package com.star.springboot; import java.util.ArrayList; import org.springframework.stereotype.Controller; import org.springframework.web.bind.annotation.RequestMapping; import org.springframework.web.servlet.ModelAndView; @Controller public class TestController { @RequestMapping("/") public ModelAndView index(ModelAndView mav) { mav.setViewName("index"); ArrayList<Person> list = new ArrayList<Person> (); list.add(new Person("kim", "kim@a.com")); list.add(new Person("lee", "lee@b.com")); list.add(new Person("park", "park@c.com")); mav.addObject("list", list); return mav; } class Person { public String name; public String email; public Person(String name, String email) { this.name = name; this.email = email; } } } | cs |
- index.html
1 2 3 4 5 6 7 8 9 10 11 12 13 14 15 16 17 18 19 20 21 22 23 24 | <!DOCTYPE html> <html xmlns:th="http://www.thymeleaf.org"> <head> <meta http-equiv="Content-Type" content="text/html; charset=UTF-8" /> <title>Title</title> </head> <body> <h1>Hello</h1> <!-- 인라인 처리 --> <table th:inline="text" border="1"> <tr> <td>NAME</td> <td>E-MAIL</td> </tr> <tr th:each="person:${list}"> <td>[[${person.name}]]</td> <td>[[${person.email}]]</td> </tr> </table> </body> </html> | cs |
- 실행 결과
3. 인라인 처리 in 자바스크립트
<script th:inline="javascript"></script> 내에서 적용됩니다.
/*[[${값}]]*/ 의 형식으로 사용합니다.
- TestController.java
1 2 3 4 5 6 7 8 9 10 11 12 13 14 15 16 17 18 | package com.star.springboot; import org.springframework.stereotype.Controller; import org.springframework.web.bind.annotation.PathVariable; import org.springframework.web.bind.annotation.RequestMapping; import org.springframework.web.servlet.ModelAndView; @Controller public class TestController { @RequestMapping("/{num}") public ModelAndView index(@PathVariable int num, ModelAndView mav) { mav.setViewName("index"); mav.addObject("num", num); return mav; } } | cs |
- index.html
1 2 3 4 5 6 7 8 9 10 11 12 13 14 15 16 17 18 19 20 21 22 23 24 25 26 27 28 29 | <!DOCTYPE html> <html xmlns:th="http://www.thymeleaf.org"> <head> <meta http-equiv="Content-Type" content="text/html; charset=UTF-8" /> <title>Title</title> </head> <body> <h1>Hello</h1> input value : <input type="number" id="val"/><br /> result : <input type="number" id="result" readonly="readonly"/><br /> <button onclick="plus()">Click</button> <script src="https://code.jquery.com/jquery-3.2.1.slim.min.js" integrity="sha256-k2WSCIexGzOj3Euiig+TlR8gA0EmPjuc79OEeY5L45g=" crossorigin="anonymous"> </script> <script th:inline="javascript"> function plus() { var val = $("#val").val(); var num = /*[[${num}]]*/; $("#result").val(val*1 + num*1); } </script> </body> </html> | cs |
- 실행 결과
템플릿 프래그먼트는 다음 포스팅으로 넘기겠습니다.
타임리프 끝이 보이네요.
'공부 > Spring Boot' 카테고리의 다른 글
| [Spring Boot] 7. 타임리프 (4) (6) | 2018.02.01 |
|---|---|
| [Spring Boot] 5. 타임리프 (2) (0) | 2017.12.01 |
| [Spring Boot] 4. 타임리프 (1) (2) | 2017.11.24 |
| [Spring Boot] 3. 데이터 주고받기 (0) | 2017.11.18 |
| STS, Eclipse 에서 Maven istall 할 때 발생하는 에러 해결법 (0) | 2017.11.10 |
Comments


